AB testing has long been a strategy at JustGiving to progressively innovate on features so that our applications work in the best way possible and provide the most benefit to our users and charities.
In this post, we are going to show how we set up a simple experiment and how the results can be used to improve components over time.
The idea of an AB test is to randomly present the user with a variation of a component when they visit a page. This variation is stored and presented to them again should they leave and return to the same page. If they undertake some action we have determined as being a marker for success, for example, clicking a button, we would track that. Over time, we can plot how successful each variation is and compare them against each other, giving us a clear idea of how a change will affect the user's behaviour.
We can illustrate this using the following example. Take these two donate button variations.
The first is our control group, this is our donate button as it currently exists on a Fundraising page. The second is a variation. We are trying to gauge if adding a lock icon makes a donor feel more secure in their donation, and therefore, be more willing to donate. To know which of these variations is best we mark success when a user clicks the button. By gathering this data over time, we are able to determine which button is more likely to make a user donate.
Setting up the experiment
With an understanding of how we perform an AB test, we can begin setting up the experiment. To do this we are going to use react-ab-test. This package provides us with two components, Experiment and Variant. With these components, we can construct an experiment and provide different variations to the user.
Begin by adding the package. If you're using npm.
npm install react-ab-testOr if you're using yarn.
yarn add react-ab-testWe can then set up our Experiment and Variant components. First, import the components and add an experiment with the two different variants. We will use the example defined above with our donate button variants.
import React from 'react';
import * as Experiment from 'react-ab-test/lib/Experiment';
import * as Variant from 'react-ab-test/lib/Variant';

enum Variants {
  A = 'A',
  B = 'B',
}

export function DonateButtonExperiment() {
  return (
    <Experiment name="donate-button-test">
      <Variant name={Variants.A}>
        <DonateButton />
      </Variant>
      <Variant name={Variants.B}>
        <LockedDonateButton />
      </Variant>
    </Experiment>
  );
}
Now when our component loads, a variant will be chosen randomly and the choice saved to the local storage. This means that when the user revisits the page, the same variant will be displayed to them.
Marking success
With our experiment setup, we can mark success when either button is clicked. At JustGiving, we use a custom AB service to track successful variants, however, this can be replaced with any other service that can track AB testing, such as Google Analytics. To make the request we will use use-http.
npm install use-httpOr if you're using yarn.
yarn add use-httpWe can then make our request to the AB service when either donate button is clicked, passing the successful variant.
import React from 'react';
import * as Experiment from 'react-ab-test/lib/Experiment';
import * as Variant from 'react-ab-test/lib/Variant';
import useFetch from 'use-http';

enum Variants {
  A = 'A',
  B = 'B',
}

export function DonateButtonExperiment() {
  const { post } = useFetch('http://yourabservice');

  async function markVariantSuccessful(variant: Variant) {
    await post('/markSuccess', { variant });
  }

  return (
    <Experiment name="test">
      <Variant name={Variants.A}>
        <DonateButton onClick={() => markVariantSuccessful(Variants.A)} />
      </Variant>
      <Variant name={Variants.B}>
        <LockedDonateButton onClick={() => markVariantSuccessful(Variants.B)} />
      </Variant>
    </Experiment>
  );
}
Analysing the results
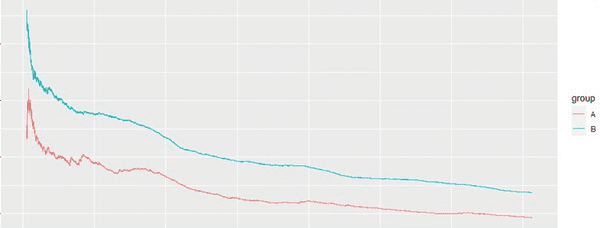
With the button being tracked we can then monitor how successful each variant is. Using the data, our analytics team is able to produce charts that depict the usage over time. Here is how our example performed.
The graph shows that variant B was more successful, meaning the variant had a positive effect on donation clicks over time. Using this data, we can now progress forward and try out more iterations of the donate button while using our more successful lock donate button as the control group. We could try a different icon, change the styling, alter the position or size, as long as we have a control group to compare against we're able to change the button in whatever way we think works best. We can then compare the changes to see which one the user prefers. Try it yourself, I think you'll be surprised about what the user really thinks.


